![]() After spending much time in OOP PHP (Object Oriented PHP) and choosing Codeigniter as my first PHP framework, I decided to start working with Zend Framwork which is said to be less lightweight but seems to be a well-documented and universal reference.
After spending much time in OOP PHP (Object Oriented PHP) and choosing Codeigniter as my first PHP framework, I decided to start working with Zend Framwork which is said to be less lightweight but seems to be a well-documented and universal reference.
Zend download (ZF) and local installation on MAMP MAc OSX 10.6.8
I’m using MAMP on Mac OSX 10.6.8. I’ve changed MAMP’s document root (in /Applications/MAMP/htdocs by default) to :
DocumentRoot "/Users/my_name/Sites"
in /Applications/MAMP/conf/apache/httpd.conf
So all my PHP projects are stored in /Users/my_name/Sites/. That’s the directory in which I’ll set up ZF.
First download ZF from http://framework.zend.com/download/latest or follow the “Download Now” link from the homepage. I chose the Zend Framework 1.11.11 Full package for download. Unzip it and copy the uncompressed ZF directory to your local web server : /Users/my_name/Sites/ZF/ in my case.
You’ll have to change your php.ini file to declare the path to ZF’s library, which will be required by the applications you’ll create. So open your php.ini file (/Applications/MAMP/conf/PHPX.X/php.ini or browse the /Applications/MAMP/ directory to find it (PHPX.X stands for your current PHP version)) and change your include_path :
;include_path = “.:/Applications/MAMP/bin/php5.3/lib/php” This line has been commented (use of “;” in front of the line) and replaced by the following:
include_path = “.:/Applications/MAMP/bin/php5.3/lib/php:/Users/olivier/Sites/ZF/library”
Don’t forget to restart MAMP once your include_path has been modified ![]()
Create a ZF project : the Terminal magical way
Open a Terminal window found in Applications/Utilitaires/Terminal. Then use the following command to place yourself in MAMP’s Document Root :
cd /Users/my_name/Sites
Then type the following command :
/Users/my_name/Sites/ZF/bin/zf.sh create project my_zend
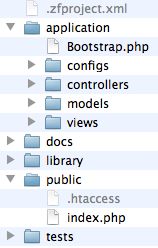
The ZF shell script will be executed and will generate the directory /Users/my_name/Sites/my_zend/ with the following directory tree :

The application directory contains files structured in the MVC pattern. If you’re not new to frameworks like Codeigniter, you know what it means :
- Models : will contain files with queries to the database
- Views : will contain files with Html, Css
- Controllers : will receive the client’s request, treat it, make calls to models and output data in views
The only directory that should be reachable from an internet client is the public directory. Therefore, we will create a Virtual Host.
Using VirtualHosts in MAMP
The use of virtual hosts can be very useful. Indeed, in the default configuration, reaching our new project can be done through the use of the following url :
http://localhost:8888/my_zend (8888 being the default http port in MAMP)
It is possible to reach the site through the url http://my_zend:8888. I personnally use http://my_zend.local:8888 as a virtualhost in order not to mix local websites with internet websites.
In order to achieve this, you’ll have to modify 2 files ; /private/etc/hosts and /Applications/MAMP/conf/apache/httpd.conf. Those files are important files for which you should save a copy thanks to the following command in Terminal :
cp /private/etc/hosts /private/etc/hosts.bak
and
cp /Applications/MAMP/conf/apache/httpd.conf /Applications/MAMP/conf/apache/httpd.conf.bak
In Terminal, type
sudo nano /private/etc/hosts
You’ll be prompted to type your Mac’s Super User password. and will be able to modify hosts. Use the keyboard arrows to get to the bottom line of the file and type
127.0.0.1 my_zend.local
Then press [CTRL + o] to save the changes.
Open the file /Applications/MAMP/conf/apache/httpd.conf with TextEdit.app and add the following lines at the bottom of the file :
NameVirtualHost my_zend.local

<VirtualHost my_zend.local>

DocumentRoot "/Users/my_name/Sites/my_zend/public"

ServerName my_zend.local

</VirtualHost>
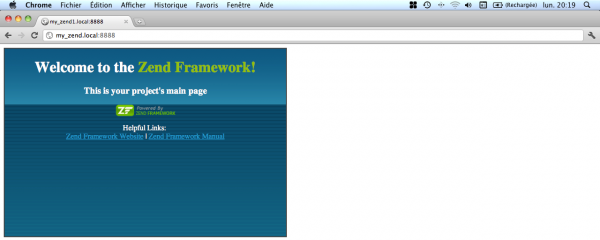
You’ve just created a new virtual host. Simply restart MAMP servers and type http://my_zend.local:8888 in your favourite browser :

Have a look at the source code : the <html>, <head> and <body> tags are missing. We’ll activate layout in ZF in order to be able to add the missing tags to all our pages.
Enable layout in ZF
Just open a terminal window and type the path to your ZF project :
cd /Users/my_name/Sites/my_zend/
Then type the following command to enable layout :
/Users/my_name/Sites/ZF/bin/zf.sh enable layout
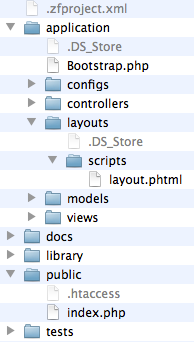
Notice the /application/layout/ directory structure :

The file /application/configs/application.ini has also been changed to point the layout directory.
In order to have a correct XHTML Doctype declaration, we have to initialize the view object because declaring a doctype will call a view. We’ll achieve this in modifying the file /application/configs/application.ini and add the following line at the bottom of the [production] section :
resources.view[] = ""
Then declare the doctype in /application/Bootstrap.php :
class Bootstrap extends Zend_Application_Bootstrap_Bootstrap

{

protected function _initDoctype()

{

$this->bootstrap('view');

$view = $this->getResource('view');

$view->doctype('XHTML1_STRICT');

}

}
This being done, you can fill the file /application/layouts/scripts/layout.phtml with the following :
<!-- application/layouts/scripts/layout.phtml -->

<?php echo $this->doctype() ?>

<html xmlns="http://www.w3.org/1999/xhtml">

<head>

<meta http-equiv="Content-Type" content="text/html; charset=utf-8" />

<title>Zend Framework Quickstart Application</title>

<?php echo $this->headLink()->appendStylesheet('/css/global.css') ?>

<script src="https://ajax.googleapis.com/ajax/libs/jquery/1.6.4/jquery.min.js"></script>

</head>

<body>

<div id="header" style="background-color: #EEEEEE; height: 30px;">

<div id="header-logo" style="float: left">

<b>ZF Quickstart Application</b>

</div>

<div id="header-navigation" style="float: right">

<a href="<?php echo $this->url(

array('controller'=>'index'),

'default',

true) ?>">Index</a>

</div>

</div>

<?php echo $this->layout()->content ?>

</body>

</html>
The source code of the generated Html pages contains all the necessary tags.
Copy Zend library folder
ZF core libraries are to be found in the downloaded /ZF/library/Zend/. Simply copy the Zend directory and copy it in your project : /Users/my_name/Sites/library/ so that it contains the zend directory.
Webliography
Zend Framework in action (Book)
Survive The Deep End (Zend book online)
Zend Tutorial by Rob Allen (3-star tutorial)


