Configurer Aptana pour connecter des bases de données MySql

Utiliser Aptana comme IDE PHP est super mais devoir systématiquement changer de fenêtre de travail pour afficher PhpMyadmin et vérifier la structure des tables Mysql devient vite lassant (même si [CMD + TAB] ou [CTRL + TAB] rendent la chose un peu plus aisée). Dans ce cadre, il pourrait être utile de configurer une connection MySql sous Aptana.

Cet article présente la configuration sous Mac OSx 10.6 avec MAMP. Mais vous pourriez aisément configurer Aptana de la même manière avec une solution LAMP (sous Linux) ou WAMP (sous Windows).

Pour cette configuration, vous aurez besoin du MySql Connector/J driver que vous trouverez sur http://www.mysql.com/downloads/connector/j/. Téléchargez-le et décompressez-le dans le répertoire /Mamp/Library/share/Mysql/Connectors/.

1. Installer le plugin Sql Explorer pour Aptana

Tout d’abord, vous devrez installer le plugin Sql Explorer plugin pour Aptana : Sélectionnez le Menu Help / Install Software, puis cliquez sur le bouton “Add” pour ajouter un site source pour l’installation du plugin. Donnez-lui un nom (MySql) et l’emplacement suivant : http://eclipsesql.sourceforge.net/

Puis sélectionnez le site source nouvellement créé de la liste déroulante et cochez “SQL Explorer” avant de cliquer sur le bouton “finish” :
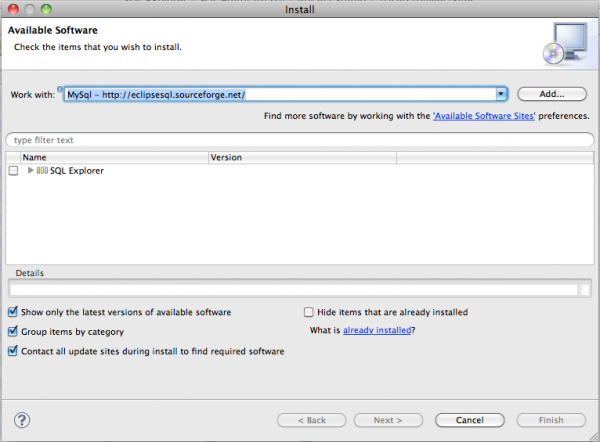
Add download site for Sql Explorer

2. Créer une connexion MySql

Ouvrez Aptana et sélectionnez le Menu Window / Open perspective / Other / SQL Explorer. Puis sélectionnez le menu Window / Showview / Connections pour créer une nouvelle connexion à MySql :
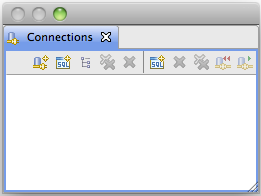
Window - Showview - Connections (create a MySql connection)

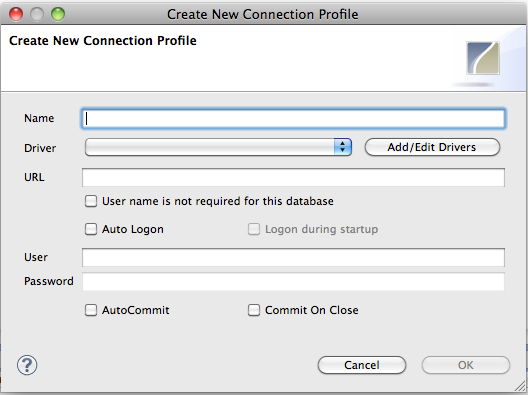
Cliquez sur le bouton “Create new connection profile” pour configurer le driver MySql : Create new database connection profile et afficher :

Configure Mysql connection

Donnez un nom à votre connexion : Mysql

Puis cliquez sur “Add/Edit drivers”, et affichez le contenu de “SQL Explorer” dans le menu de gauche et cliquez sur “JDBC Drivers” puis sélectionnez “MySql Driver”:
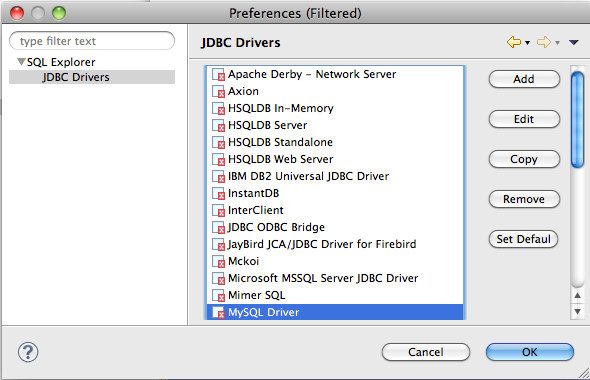
Edit MySql driver

Choisissez le bouton “Copy” pour éditer les préférences d’une copie du MySql Driver et donnez un nom à votre driver (My MySql driver) :
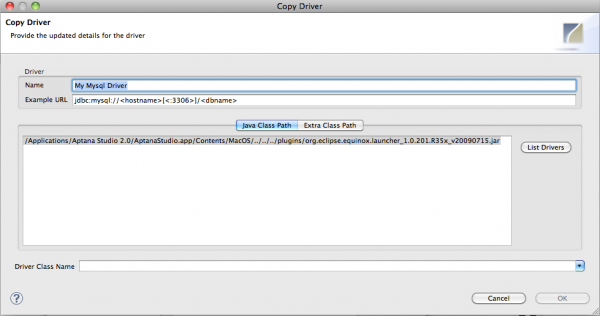
Editing Mysql driver

Editez l’example URL comme suit :

jdbc:mysql://localhost:3306/

Vous devrez aussi changer le port puisque le port 3306 est le port de connexion MySql par défaut. Ouvrez MAMP et cliquez sur Preferences / Ports :
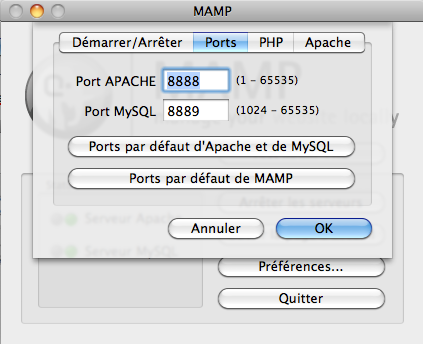
Checking MAMP MySql connection port

puis changez l’example URL du driver MySql :

jdbc:mysql://localhost:8889/

Cliquez ensuite sur le bouton “Extra class path” pour ajouter le MySql Connector/J driver (fichier mysql-connector-java-5.1.14-bin.jar) que vous trouverez dans /Mamp/Library/share/Mysql/Connectors/.

et complétez le Driver class name comme suit :

com.mysql.jdbc.Driver

Votre bopite de dialogue de Préférences driver devrait ressembler à ceci :
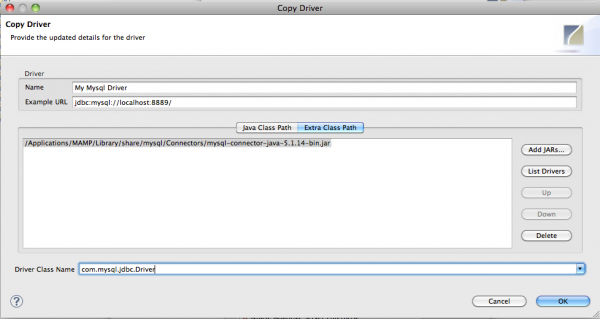
Mysql driver preferences

Cliquez “OK”. Aptana montre que votre driver a été correctement configuré :
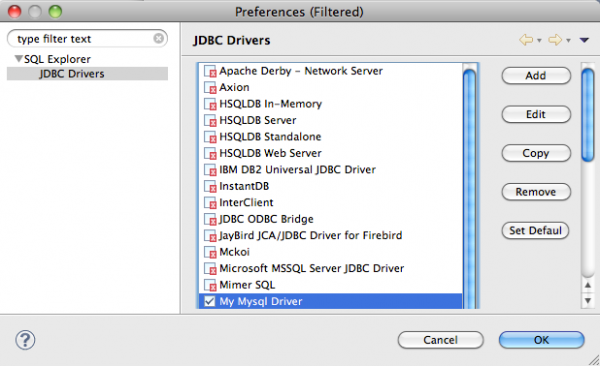
Mysql driver correctly configured

Cliquez “OK” pour sélectionner “My MySql Driver” pour la connexion courante :

Dans la boîte de dialogue “Create new connection profile”, sélectionnez le driver MySql nouvellement créé (My Mysql Driver) dans la liste déroulante. Cochez “auto logon” et saisissez le username et password root MySql :
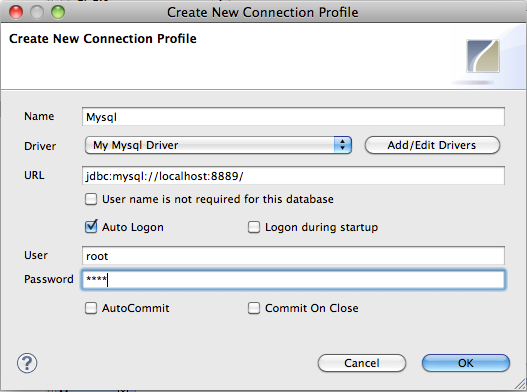
Set MySql username and password

puis cliquez “OK”. Votre connexion est maintenant prête :
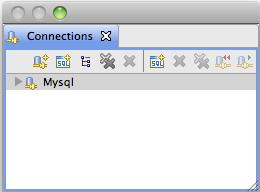
MySql connection ready

Opérez un clic droit sur votre connexion “Mysql” pour visualiser les structures de vos bases de données :
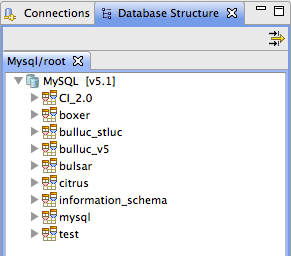
View Database structures

Configuring Aptana to connect MySql databases

Using Aptana is great but having to constantly switch to PhpMyadmin to check Mysql table structures can be tiring (even if [CMD + TAB] or [CTRL + TAB] makes it a bit easier). It may then be useful to configure a MySql connection in Aptana.

This post will tackle the configuration on Mac OSx 10.6 with MAMP installed. But you could easily configure Aptana the same way on LAMP (Linux) or WAMP (Windows) platforms.

Therefore, you’ll need the MySql Connector/J driver that can be found on http://www.mysql.com/downloads/connector/j/. Download and unzip it in the /Mamp/Library/share/Mysql/Connectors/ folder.

1. Install Sql Explorer plugin in Aptana

First, you’ll need to install the Sql Explorer plugin for Aptana : Select Menu Help / Install Software, then click “Add” to add a site for the plugin install. Give it a name (MySql) and the following location : http://eclipsesql.sourceforge.net/

Then select your newly created source site from the combo box and tick “SQL Explorer” before clicking the “finish” button :

Add download site for Sql Explorer

2. Create a MySql connection

Open Aptana and select Menu Window / Open perspective / Other / SQL Explorer. Then select Menu Window / Showview / Connections to create a new connection to Mysql :

Window - Showview - Connections (create a MySql connection)

Click on the “Create new connection profile” button to configure the MySql driver : Create new database connection profile to display :

Configure Mysql connection

Give a name to your connection : Mysql

Then click on “Add/Edit drivers”, then expand the “SQL Explorer” from the left menu and click on “JDBC Drivers” and select “MySql Driver”:

Edit MySql driver

Then click the “Copy” button to edit preferences on a copy of the item and give your driver a new name (My MySql driver) :

Editing Mysql driver

Edit the example URL as follows :

jdbc:mysql://localhost:3306/

You still need to change the port since port 3306 is the default MySql connection port. Open MAMP and click Preferences / Ports :

Checking MAMP MySql connection port

then change the MySql driver example URL :

jdbc:mysql://localhost:8889/

Then click the “Extra class path” button to add the MySql Connector/J driver (file mysql-connector-java-5.1.14-bin.jar) that is to be found in /Mamp/Library/share/Mysql/Connectors/.

and fill in the Driver class name as follows :

com.mysql.jdbc.Driver

Your driver preferences dialog should look like this :

Mysql driver preferences

Then click “OK”. Aptana now shows your driver as being correctly configured :

Mysql driver correctly configured

Click “OK” to select “My MySql Driver” for the present connection.

In the “Create new connection profile” dialog, select the newly created Mysql driver (My Mysql Driver) from the combo box. Tick “auto logon” and type the MySql root username and password :

Set MySql username and password

and click “OK”. Your Connection is now ready :

MySql connection ready

Right click your “Mysql” connection to view database structures :

View Database structures

De Notepad2 à Aptana, IDE pour Développement PHP

Eureka!

Cette fois-ci; c’est la bonne.

J’avais pris l’habitude de scripter avec Notepad2, qui possède quelques outils basiques tels que la coloration syntaxique, la numérotation des lignes, mais pas beaucoup plus.

Aptana, IDE for Web developmentJ’étais donc à la recherche d’IDE PHP (Integrated Development Environment) mais n’étais pas parvenu à me décider. Cette fois c’est fait. Il s’appelle Aptana, une solution open source pour développer des applications web.
Basé sur Eclipse, vous trouverez des téléchargements d’Aptana pour Windows, MacOS et Linux. J’ai testé les versions 64 bits pour Windows et Linux.

Aptana peut être installé avec toute une série de plugins. Je me contenterai du plugin pour le développement PHP.

Vous le trouverez sans doute un peu poussif car il nécessite de grandes ressources mais fonctionne correctement sur Core i7 2.67 GHz avec 4Go Ram avec Opensuse 11.2, et est bien sûr moins efficace sous Asus EEEPC N10 (Atom N270 (1.6 GHz) avec 2Go Ram). C’est encore avec un MacBook Pro Core 2 Duo (4 Go Ram) qu’Aptana donne les meilleurs résultats de rapidité.

Depuis la version Aptana 2.0, il est devenu moins aisé de prérarer Apatana au développement PHP. En effet, les développeurs d’Aptana ont décidé d’implémenter le plugin Eclipse PDT (PHP Development Tools project) pour remplacer le plugin PHP qui était utilisé avec l’ancienne version Aptana 1.5. Le problème est que le plugin Aptana PHP plugin est bien mieux que le PDT, comme l’explique bram.us.

Télécharger et installer Aptana

Tout d’abord, téléchargez Aptana. J’ai choisi la version standalone. Une fois installée, allez dans le menu Help / Install new software et ajoutez une nouvelle source (http://update.aptana.com/install/php) et suivez l’assistant d’installation d’Aptana PHP 1.1 Developement Environment.

Configurer Aptana et le PHP plugin

Menu Window / Showview ouvrira diverses fenêtres : gestionnaire de fichier, propriétés,…

Menu Window / Preferences / General vous permet de choisir le simple ou le double clic pour ouvrir un fichier.

Menu Window / Preferences / General / Editors / File Associations devrait afficher les fichiers *.php associés à l’Aptana PHP Editor par défaut.

Menu Window / Preferences / General / Editors / Text Editors permet de faire afficher les numéros de ligne.

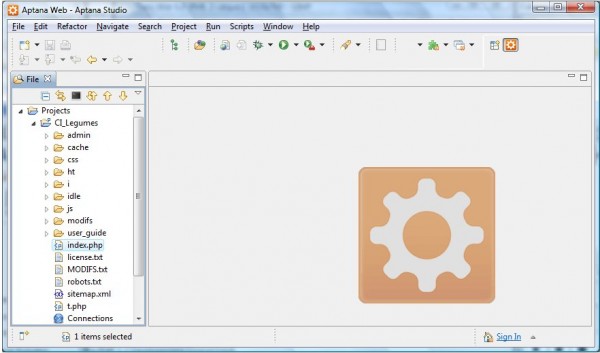
aptana Create new PHP projectPour créer un nouveau projet PHP, affichez le menu Window / Showview / File et faites un clic droit sur “Projects” pour afficher le menu contextuel. Ensuite, choisissez New / Project / Web / PHP Project. Insérez un nom de projet et le répertoire source si pertinent.
Aptana PHP

Ce qui est puissant dans Aptana par rapport à un éditeur basique comme Notepad2 est que :

  • Aptana offre une validation du code en temps réel
  • Il dispose d’un outil Code Assist
  • et d’autres Code preview…

Changer le Workspace

Si vous désirez changer lespace de travail par défaut et stocker vos projets Aptana sur une autre partition que la partition C: définie par défaut, sélectionnez le Menu File / Switch Workspace / Other… et identifiez votre partition de travail…

Afficher les fichiers .htaccess

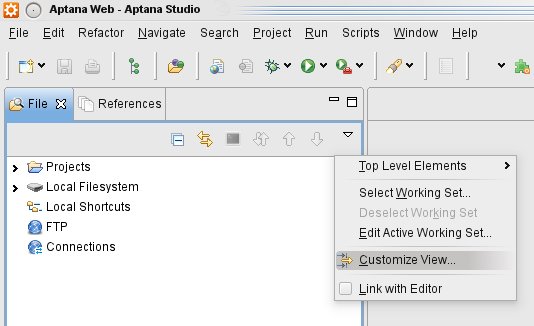
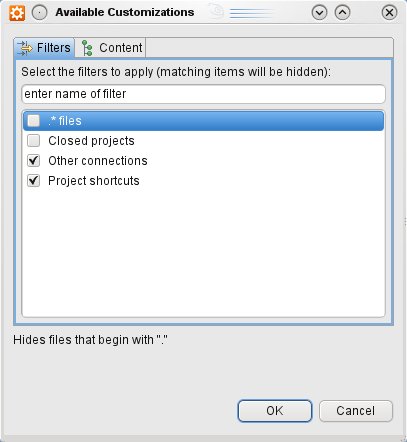
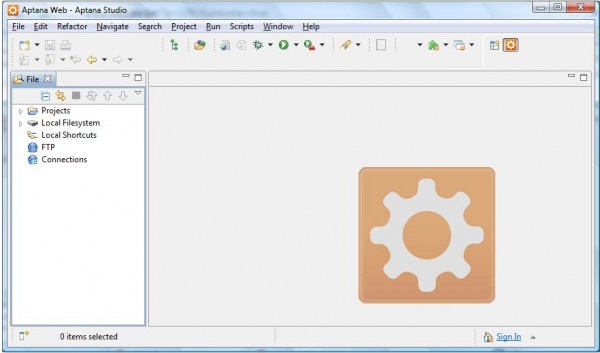
Par défaut, les fichiers .htaccess files ne s’afficheront pas dans la Vue File. Pour pouvoir les aficher et les modifier, cliquez sur la flèche liste déroulante de la Vue File et sélectionnez “Customize View” puis décochez le filtre .* files :

View .htaccess files in AptanaView .htaccess files in Aptana

Empêcher Aptana de créer un fichier index.php

Quand vous créez un nouveau projet avec Aptana configuré tel qu’expliqué ci-dessus, il essaie de créer un fichier index.php qui contient la ligne de code pour afficher le phpinfo();

Si vous voulez empêcher Aptana de créer ce fichier par défaut, ouvrez le Menu Window / Preferences / Aptana / Editors / PHP et décochez “create project file in new PHP Project”.

Webliography

Aptana Studio 2

Installer Aptana PHP plutôt que le plugin Eclipse PDT

From Notepad2 to Aptana, IDE for PHP Dev

This time I’ve found it!

I used to script with notepad2, which features a basic color syntaxing and line numbering, but not more!

Aptana, IDE for Web development

I’ve looked for PHP IDEs (Integrated Development Environment) for a while but had never made a choice. This time, I’m ready to move to the one I’ve tested : It’s called Aptana, an open source solution to build web applications.

Based on Eclipse, you’ll find Aptana downloads for Windows, MacOS and Linux. I’ve tested Linux and Windows 64bits versions.

Aptana offers many plugins for developement. I’ll stick to PHP development.

Some may find it too resource-hungry but it works fine on Core i7 2.67 GHz with 4Go Ram memory with Opensuse 11.2, and is a bit less efficient on Asus EEEPC N10 (Atom N270 (1.6 GHz) with 2Go Ram memory). Aptana seems to be working quickly on MacBookPro Core2 Duo (4Go Ram).

Since Aptana 2.0, things seem to have become a bit less easier for PHP Web developers. Indeed, Aptana developers have decided to implement the Eclipse PDT plugin (PHP Development Tools project) to replace the Aptana PHP plugin that was used with older Aptana 1.5. The problem is the Aptana PHP plugin is much better than the PDT, as stated on bram.us.

Download and install Aptana

First download Aptana. I’ve chosen the standalone version. Once installed, go to Menu Help / Install new software and add a new source (http://update.aptana.com/install/php) and follow the wizard to install Aptana PHP 1.1 Developement Environment.

Configure Aptana and PHP plugin

Menu Window / Showview will open different kinds windows : file manager, properties,…

Menu Window / Preferences / General lets you choose between single or double click to open a file.

Menu Window / Preferences / General / Editors / File Associations should display *.php files associated with Aptana PHP Editor set as default.

Menu Window / Preferences / General / Editors / Text Editors lets you display line numbers.

Aptana create new project

In order to create a new project, display the Menu Window / Showview / File and right-click on “Projects” to display the context menu. Then Choose New / Project / Web / PHP Project. You’ll be asked a Project name and the source directory.

Aptana PHP

What is most powerful when you compare a simple editor as Notepad2 with Aptana is:

  • it provides real-time code validation
  • code Assist
  • Code preview…
  • Switching workspace

Then you may want to switch workspace and have your Apatana projects stored on another partition than the default C: partition. So, select Menu File / Switch Workspace / Other… and select your workspace partition…

Displaying .htaccess files

By default, .htaccess files won’t show in the File View. In order to be able to view them and modify them, click on the dropdown arrow of the File View then select “Customize View” and untick the .* files option :

View .htaccess files in AptanaView .htaccess files in Aptana

Prevent Aptana from creating index.php file

When you create a new project with Aptana configured the way it is above, it attempts to create an index.php file to display the phpinfo();

If you want to get rid of this, simply open Menu Window / Preferences / Aptana / Editors / PHP and untick “create project file in new PHP Project”.

Webliography :

Aptana Studio 2

Install Aptana PHP rather than the Eclipse PDT plugin